后台管理模板
介绍
以下是后台管理端模板说明 我们在做项目的时候,每个项目都需要一个管理后台,这个后台以前我们用 layui 后台人员来做的,后来发现实在太丑了,于是 20 年底,我主张用最新的技术 vue,来进行后台管理框架的封装。要求的目的是简单,高效且门槛低。
经过多方尝试我们确定了初步方向,
- element-ui为界面主要框架,因为它的组件比较丰富,最主要 UI 界面美观大方。
- 我们希望通过后台接口数据的形式直接生成页面,因为以前的 layui 是直接链接数据库的。我们本意想不开发接口,直接实现对接。
- 拓展性能强,能支持长久的迭代,并能对后面项目形成模板化的基础。 最终我们经过我们多方尝试,多方参考,发现了现市面上已经有了我们理想接近的框架Avue.JS。他们已经将 element-UI 进行了整合,并支持 JSON 进行驱动。我们喜出望外。并决定了最终方案 element-UI+Avue.JS+vue-element-admin 进行了后台框架模板的封装 所以,在开发的时候,你需要先过一遍以上三个开发文档。对它们必须有一个较为深入的认知。你才能真正的掌握该框架。才有对框架提出优化升级的资格。
当然,框架封装的目的本身是为了易用,简单。如果你仅仅是作为外援的身份临时用该框架,则按照本知识库的指引,足以让你半天内着手开发,因为,它的使用真的非常简单。
本知识库将从当下框架的服务能力,架构体系,模块儿组成,搭建规范等四个方面来对框架进行阐述,让大家快速入门,我对于全职员工的期待是 3 天入门,5 天熟练,15 天精通。编程,原来如此简单....
框架演示

默认登陆账号:admin 默认登陆密码:123 所有项目通用 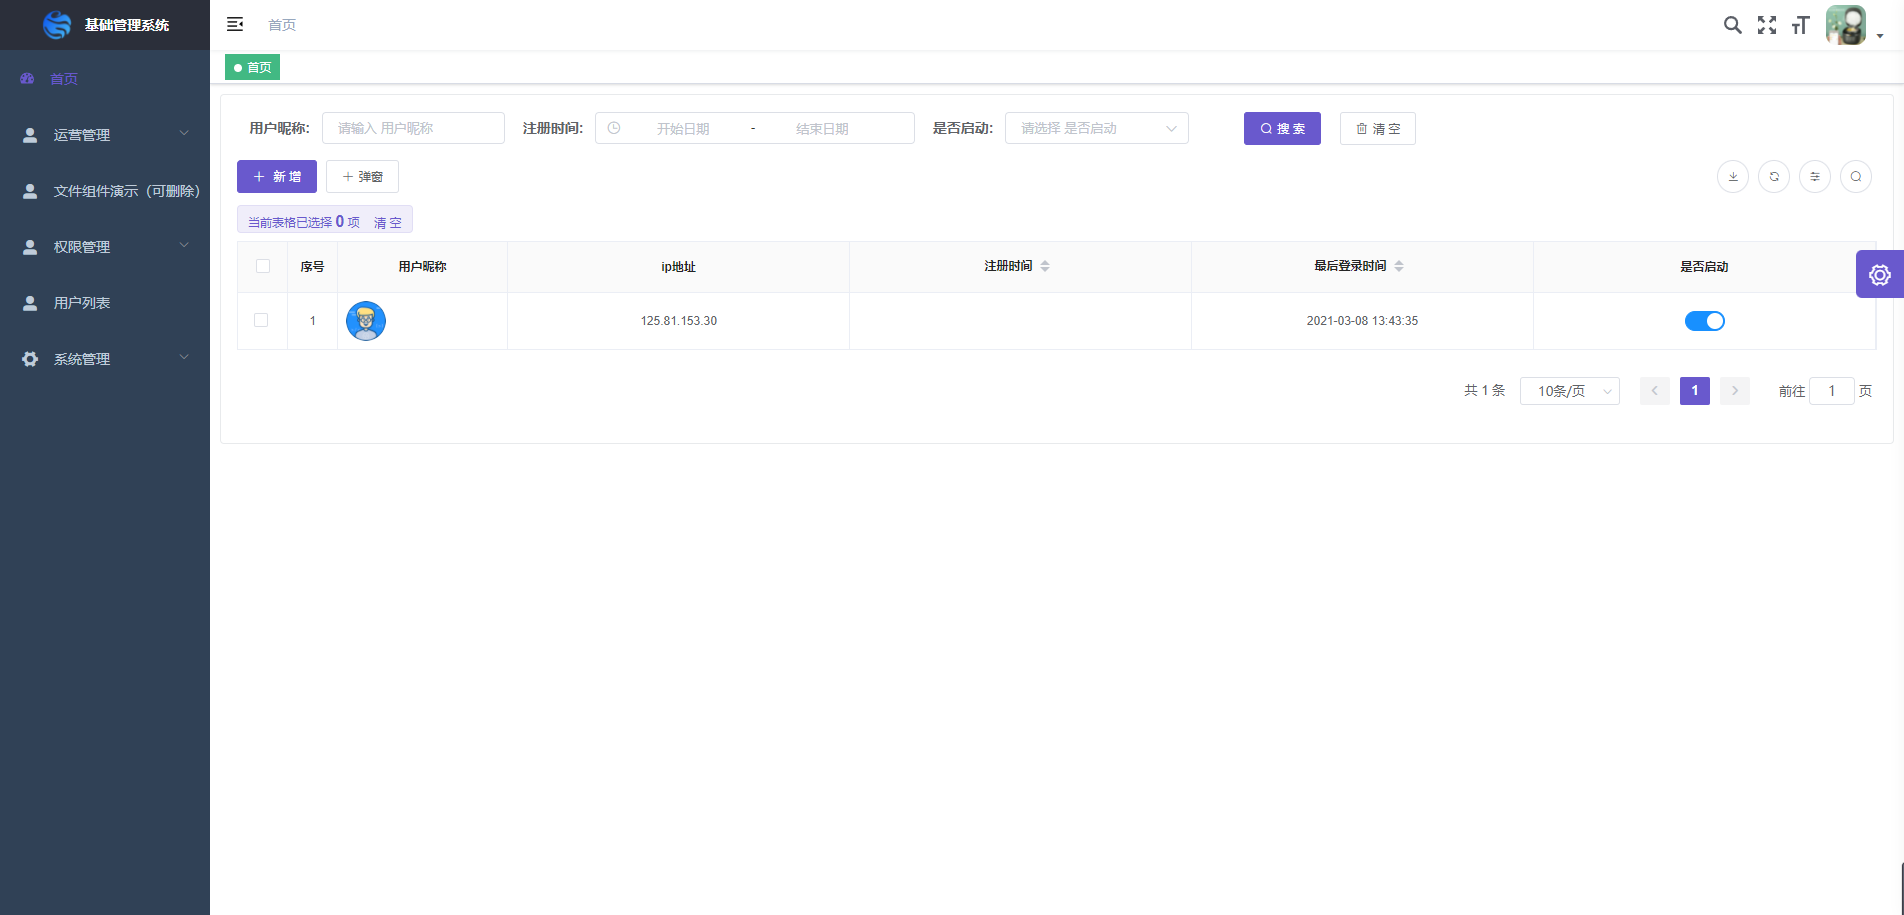
首页--默认为用户列表 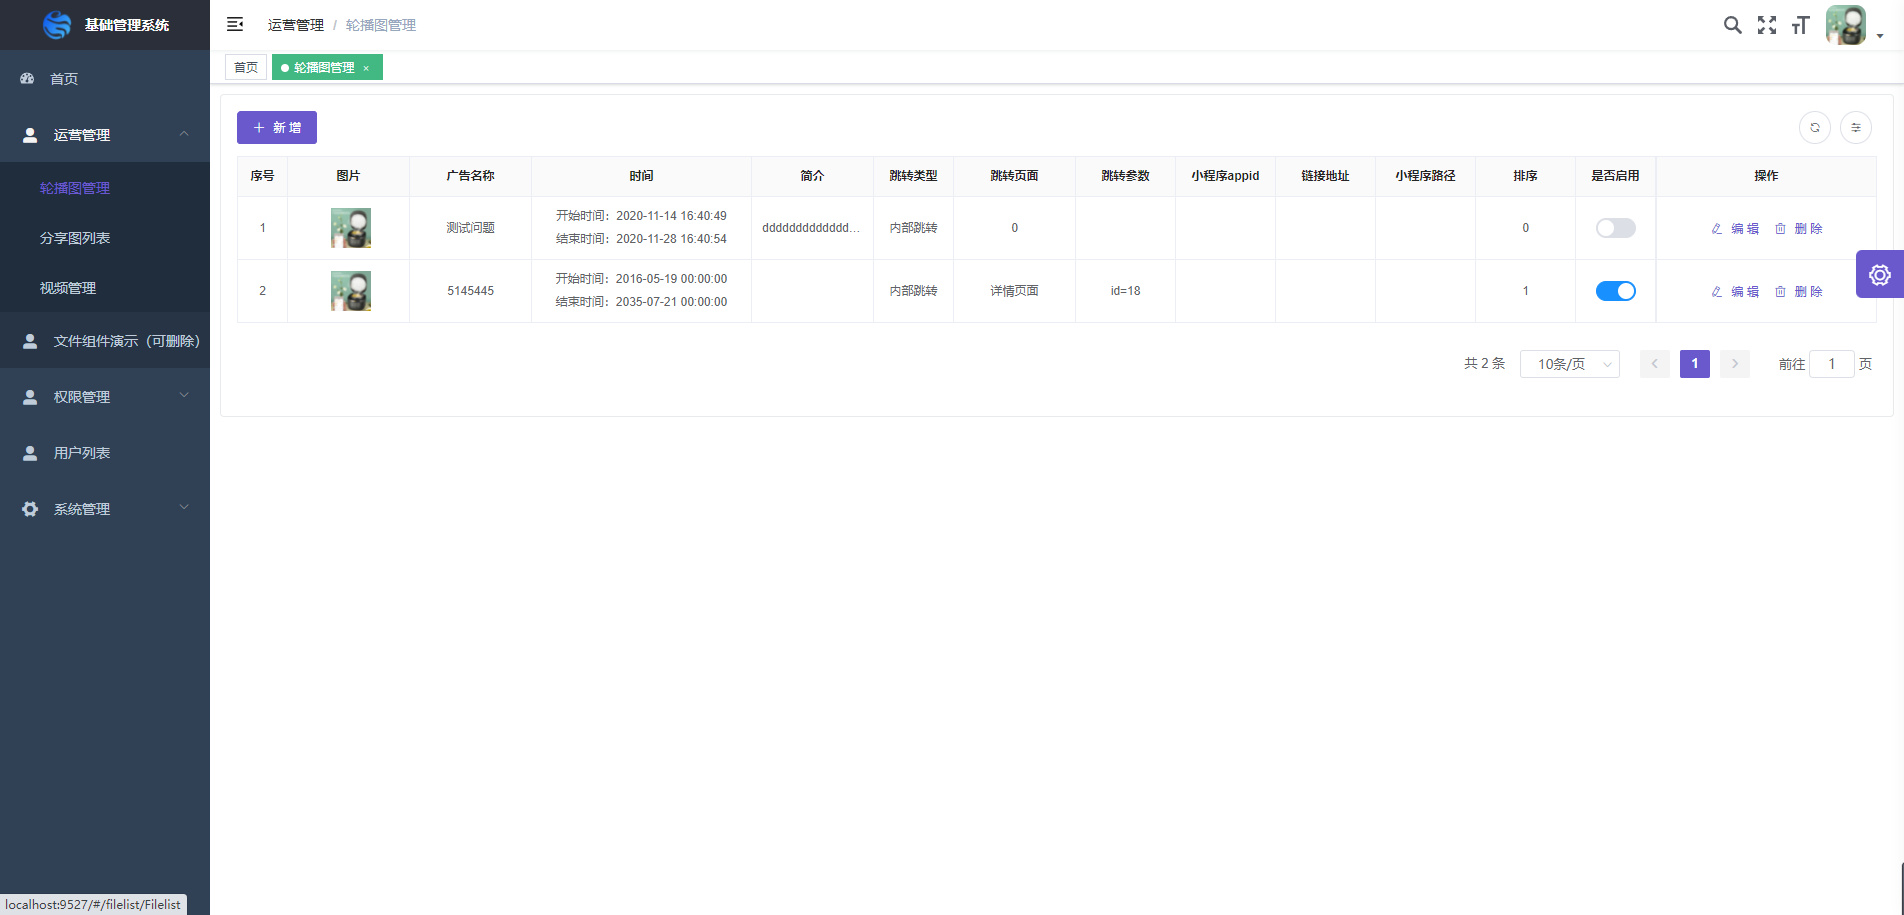 轮播图,全应用通用,已疯转好跳转小程序,内部页面,外部 url 链接等功能,几乎不用改动
 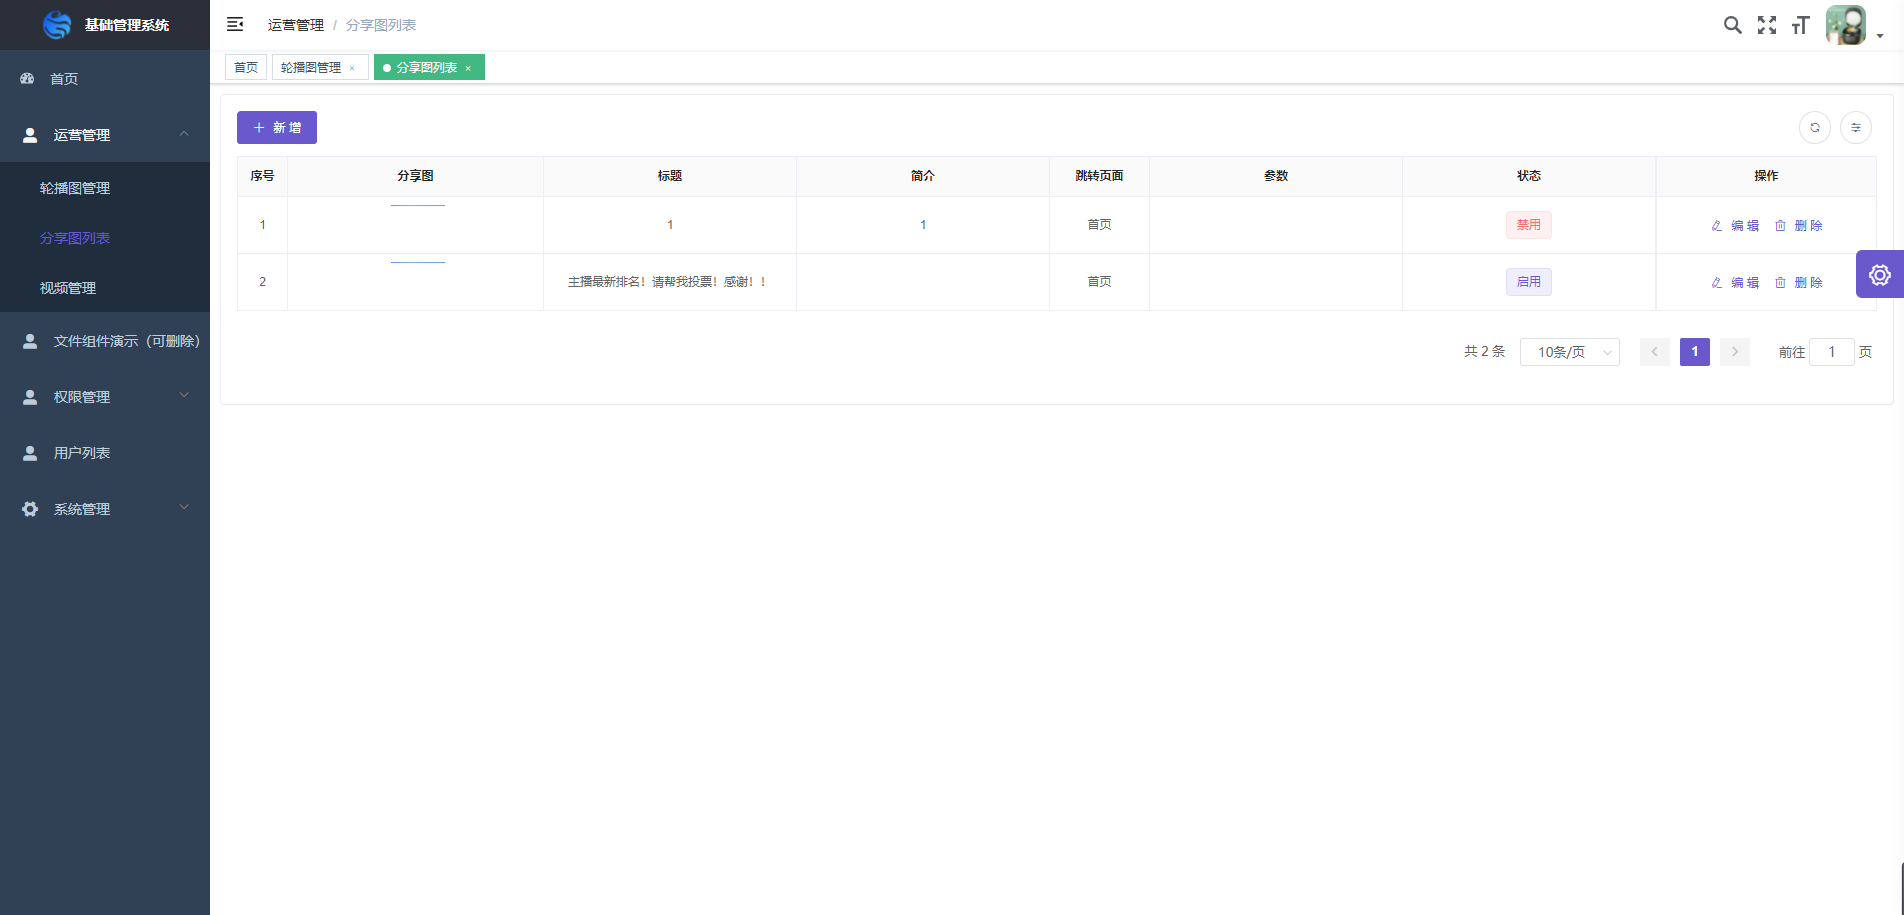 分享图,封装的微信小程序分享图与页面绑定,不用再动
 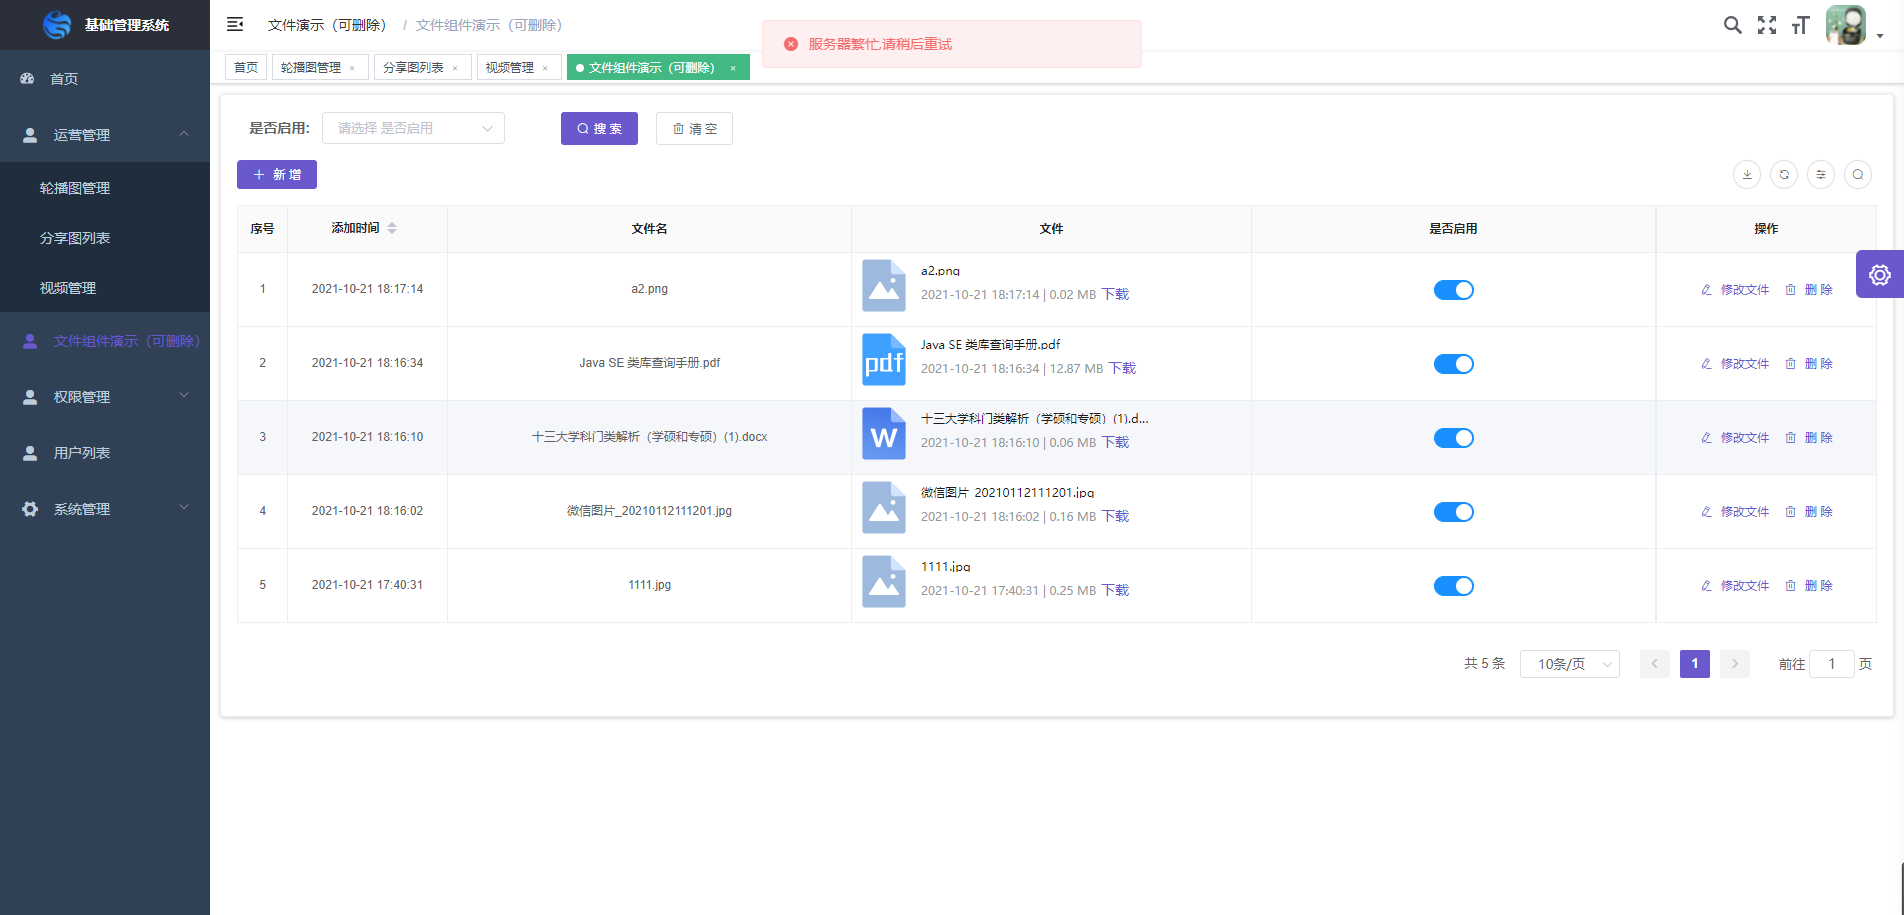 文件管理,封装用于有文件上传的后台项目,已处理图标
 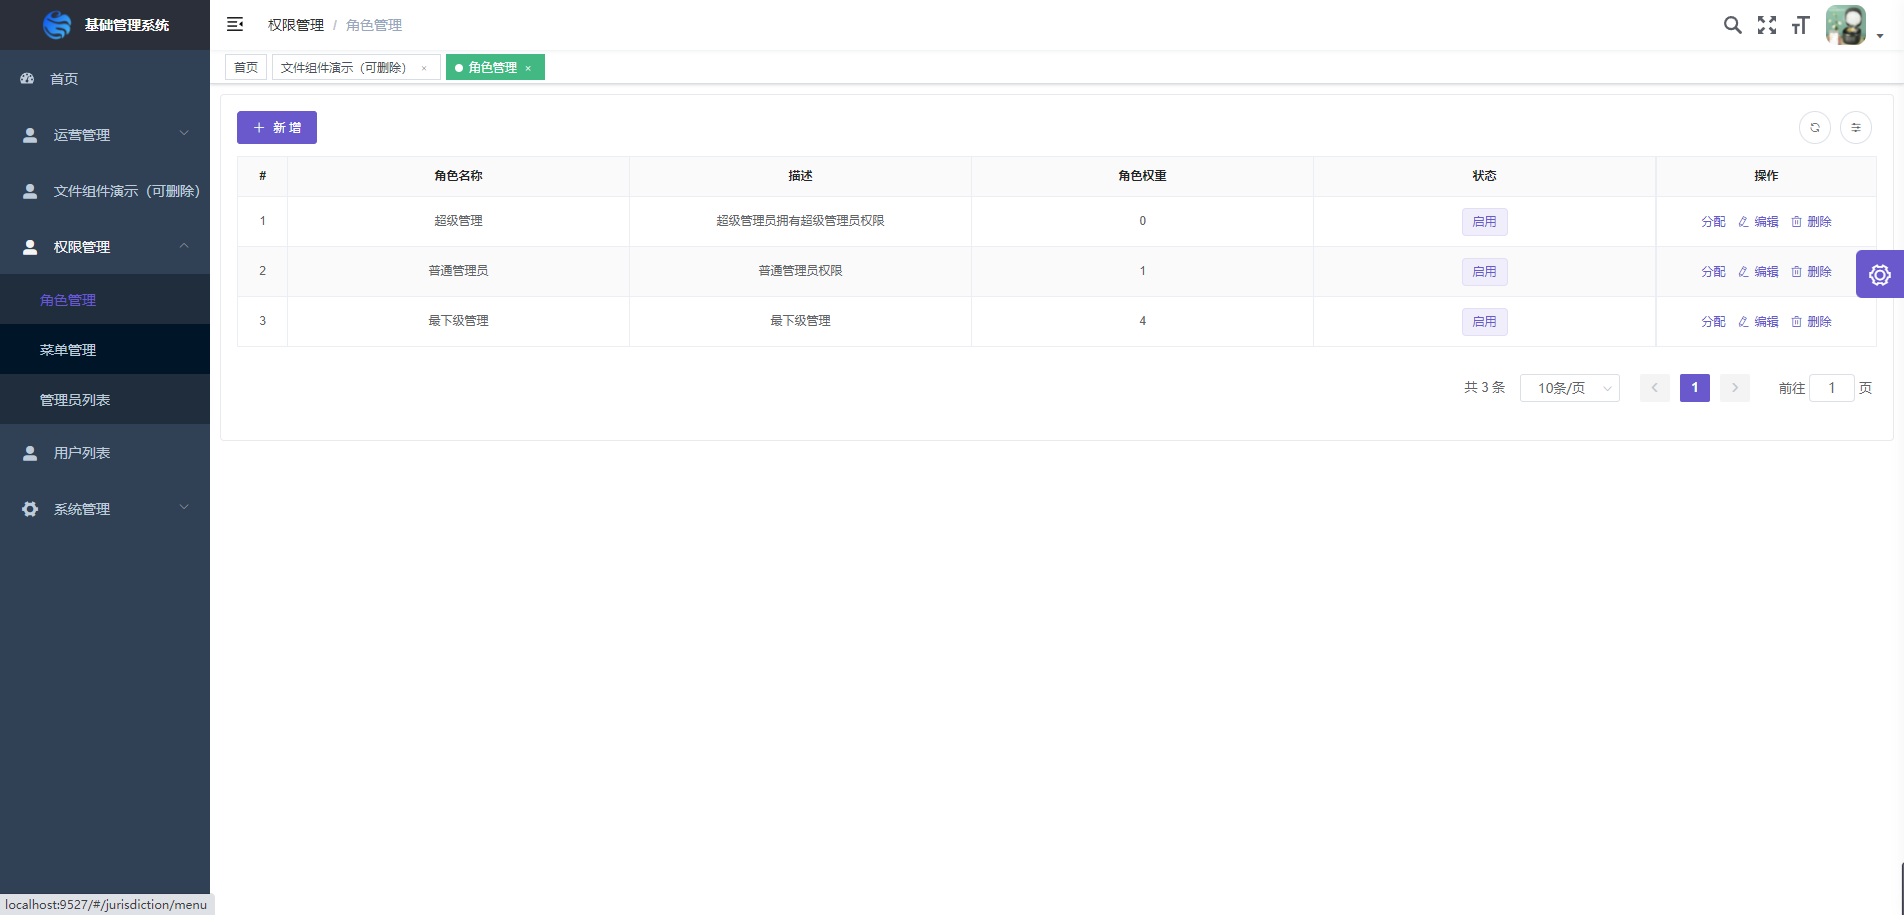 菜单,角色,管理员都已处理好,可以快速的分离总分站
 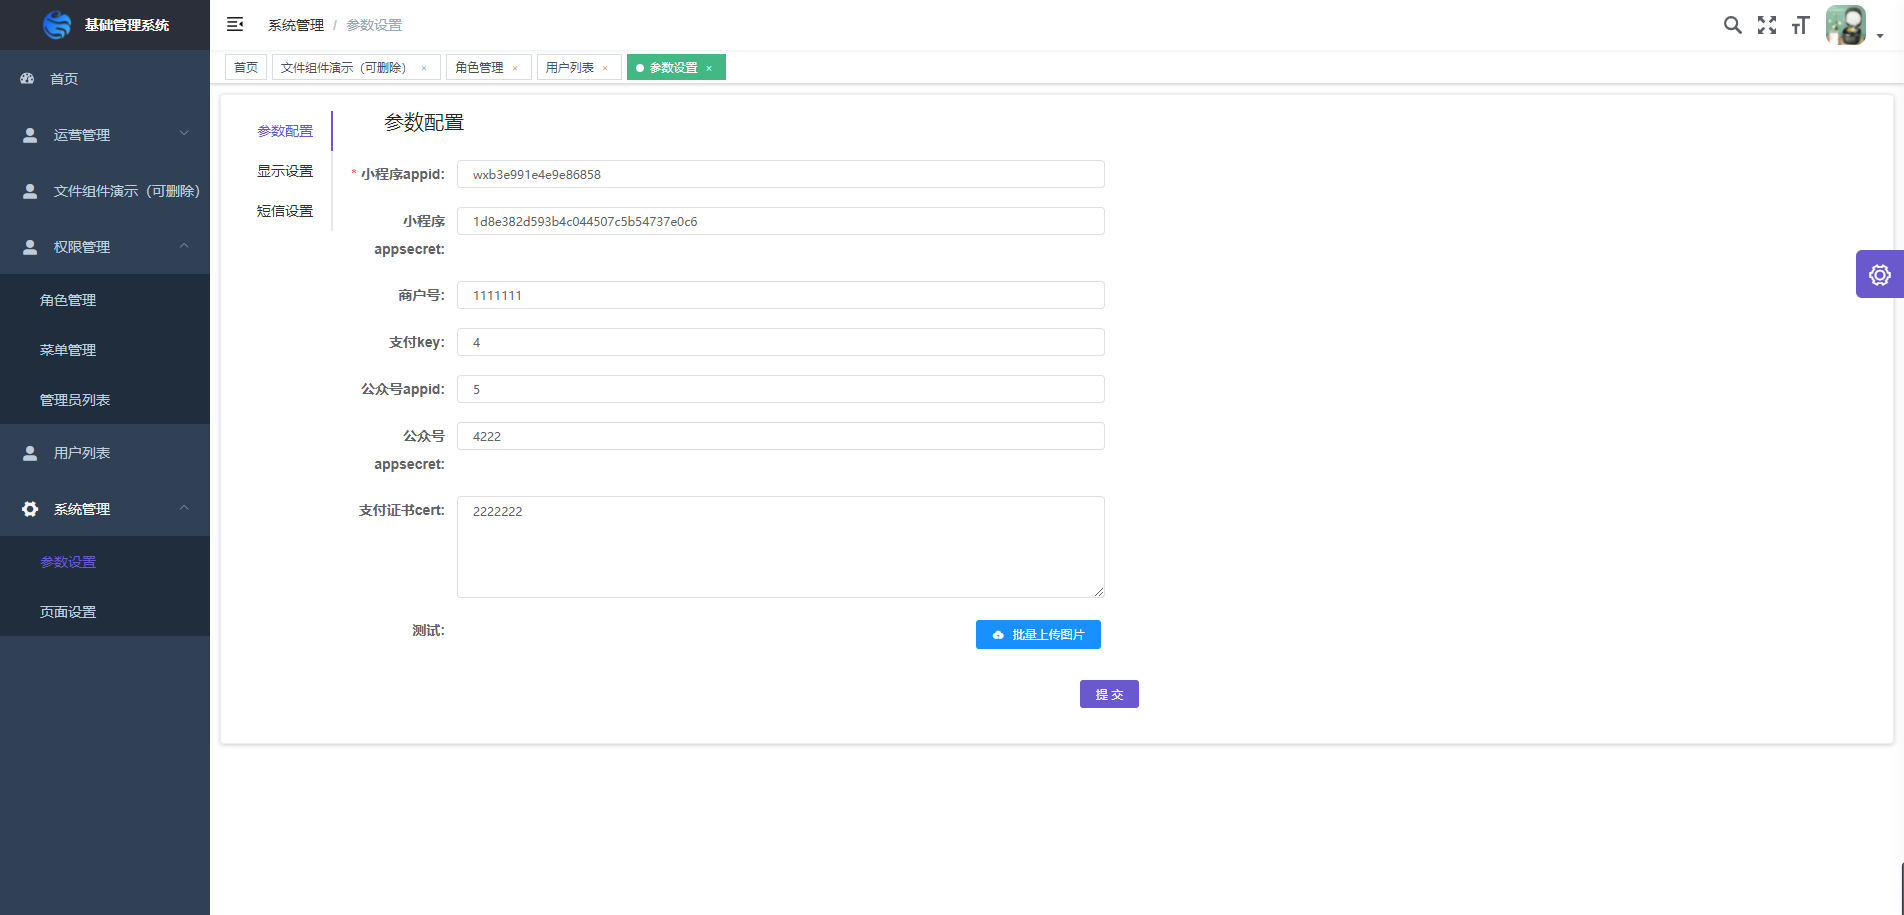 系统配置已经处理好
前序准备
- 本地创建目录 test
- 目录下 shift+鼠标右键,运行 Povershell 窗口
git init初始化 gitgit remote add origin https://gitee.com/ylsg_1/basic-background-template.git添加本地仓库 origingit pull origin master将远程项目拉到本地目录中,等待拉取结束cnpm install安装项目依赖npm run dev运行项目
git init
#初始化git

git remote add origin https://gitee.com/ylsg_1/basic-background-template.git
#添加本地仓库origin

git pull origin master
#将远程项目拉到本地目录中,等待拉取结束

cnpm install
#安装项目依赖

npm run dev
#运行项目
运行成功后,你将看到登录页面,输入默认账号:admin 密码:123
目录结构
├── build                      # 构建相关
├── mock                       # 项目mock 模拟数据
├── plop-templates             # 基本模板
├── public                     # 静态资源
│   │── favicon.ico            # favicon图标
│   └── index.html             # html模板
├── src                        # 源代码
│   ├── api                    # 所有请求
│   ├── assets                 # 主题 字体等静态资源
│   ├── components             # 全局公用组件
│   ├── directive              # 全局指令
│   ├── filters                # 全局 filter
│   ├── icons                  # 项目所有 svg icons
│   ├── lang                   # 国际化 language
│   ├── layout                 # 全局 layout
│   ├── router                 # 路由
│   ├── store                  # 全局 store管理
│   ├── styles                 # 全局样式
│   ├── utils                  # 全局公用方法
│   ├── vendor                 # 公用vendor
│   ├── views                  # views 所有页面
│   ├── App.vue                # 入口页面
│   ├── main.js                # 入口文件 加载组件 初始化等
│   └── permission.js          # 权限管理
├── tests                      # 测试
├── .env.xxx                   # 环境变量配置
├── .eslintrc.js               # eslint 配置项
├── .babelrc                   # babel-loader 配置
├── .travis.yml                # 自动化CI配置
├── vue.config.js              # vue-cli 配置
├── postcss.config.js          # postcss 配置
└── package.json               # package.json
修改配置文件
@src/settings.js
//接口域名【只用改这里域名就好了】
let baseUrl = "https://xinjichu.xxxyin.cn";
// 图片上传接口(不用动)
let uploadImg = "base/upload_img";
// 文件上传接口(不用动)
let uploadFile = "base/upload_file";
const defaultRoleStatus = true; // 默认权限
module.exports = {
  //这里是项目名字,改下就行
  title: "基础管理系统",
  //  defaultTheme: '#408EFF',   推荐默认主题
  defaultTheme: "#6959CD",
  defaultRoleStatus,
  /**
   * @type {boolean} true | false
   * @description Whether show the settings right-panel
   */
  showSettings: true,

  /**
   * @type {boolean} true | false
   * @description Whether need tagsView
   */
  tagsView: true,

  /**
   * @type {boolean} true | false
   * @description Whether fix the header
   */
  fixedHeader: false,

  /**
   * @type {boolean} true | false
   * @description Whether show the logo in sidebar
   */
  sidebarLogo: true,

  /**
   * @type {boolean} true | false
   * @description Whether support pinyin search in headerSearch
   * Bundle size minified 47.3kb,minified + gzipped 63kb
   */
  supportPinyinSearch: true,

  /**
   * @type {string | array} 'production' | ['production', 'development']
   * @description Need show err logs component.
   * The default is only used in the production env
   * If you want to also use it in dev, you can pass ['production', 'development']
   */
  errorLog: "production",

  // 文件图片前缀
  baseUrl,
  // 图片上传接口
  uploadImg,
  // 文件上传接口
  uploadFile,
  // 接口前缀
  baseApi: baseUrl + "/admin",
  //是否是手机客户端,如果是这里会限制富文本展示的预览宽度
  isPhone: false,
  // 文件上传全路径接口【富文本用的】
  uploadFileAll: baseUrl + "/admin/" + uploadFile,
  // 图片上传全路径接口【富文本用的】
  uploadImgAll: baseUrl + "/admin/" + uploadImg,
};
生产环境与线上环境接口修改
开发环境配置文件:
//.env.development
# just a flag
ENV = 'development'

# base api
VUE_APP_BASE_API = 'https://xinjichu.xxxyin.cn/admin'
//修改这个域名,开发环境中有效
线上环境配置文件:
//.env.production
# just a flag
ENV = 'production'

# base api
VUE_APP_BASE_API = 'https://xinjichu.xxxyin.cn/admin'

//修改这个域名,正式环境中有效
sequenceDiagram
Alice->John: Hello John, how are you?
loop every minute
    John-->Alice: Great!
end
新增一个页面管理模块
我们的页面由哪几部分构成呢?
   graph TB
   管理页面 --> options.js配置文件 & vue页面文件 & api.js接口文件
创建页面文件(*.vue)
我们结束当前的运行,然后我们执行以下命令
PS F:\后台模板> npm run new #用plop构建新文件
 npm run new
# 选择view 创建页面
# 输入页面名字  英文 例如:user
# 回车 就会在项目页面views目录创建出  user.vue
创建页面配置文件(*-options.js)
 npm run new
# 选择 options 创建页面配置参数
# 输入页面名字  例如: user
# 回车 就会在项目页面views目录创建出  user-options.vue
# 创建文件夹命名为user
# 把user.vue user-options.js 剪切到 @/views/user/  模块目录下
增加路由
@/router/index.js
export const asyncRoutes = [
  {
    path: "/user", // 一层目录
    component: Layout,
    redirect: "/user/user", // 第一个user是目录 第二个是user.vue
    meta: {
      title: "人员管理",
      icon: "el-icon-user-solid",
    },
    children: [
      {
        path: "user", // 修改为 user
        component: () => import("@/views/user/user"), // @/views/user/xxx  => @/views/user/xxx
        name: "用户列表",
        meta: { title: "用户列表" },
      },
      {
        path: "share-images",
        component: () => import("@/views/operate/share-images"),
        name: "分享图列表",
        meta: { title: "分享图列表" },
      },
    ],
  },
];
修改接口文件
复制@/api/admin/tp.js 修改名为 user.js查看 showdoc 文档替换接口
import request from "@/utils/request";
// 获取列表
export const getList = (data) => {
  return request({
    url: "/user/get_member_list",
    method: "post",
    data: data,
  });
};
// 删除
export const del = (id) =>
  request({
    url: "/member/del",
    method: "post",
    data: { id: id },
  });
// 添加
export const add = (data) =>
  request({
    url: "/member/add",
    method: "post",
    data: data,
  });
// 修改
export const update = (data) =>
  request({
    url: "/member/edit",
    method: "post",
    data: data,
  });
// 修改单个字段
export const updateStatus = (data) =>
  request({
    url: "/user/modify_field",
    method: "post",
    data: data,
  });
验证结果
成功会显示如下界面
管理模块儿详解
页面 vue 文件
查看 avue 文档 avue-crud 模块
<template>
  <zc-card>
    <avue-crud
      ref="crud"
      :option="option"
      :page.sync="page"
      :table-loading="loading"
      @on-load="getList"
      @row-update="rowUpdate"
      :upload-after="uploadAfter"
      :upload-before="uploadBefore"
      :upload-error="uploadError"
      @row-save="rowSave"
      @row-del="rowDel"
      @refresh-change="refreshChange"
      @search-reset="searchChange2"
      @search-change="searchChange"
      v-model="form"
      :data="data"
      :permission="permission"
    >
      <template slot="state" slot-scope="scope">
        <el-switch
          :disabled="!permission.editBtn"
          @change="
            (e) => {
              switchChange(e, scope.row.id);
            }
          "
          v-model="scope.row.state"
          :active-value="1"
          :inactive-value="2"
          active-color="#1890ff"
          inactive-color="#DCDFE6"
        ></el-switch>
      </template>

      <template slot="is_interior" slot-scope="scope">
        <el-tag type="warning" v-if="scope.row.is_interior == 1"
          >{{scope.row.$is_interior}}</el-tag
        >
        <el-tag type="success" v-if="scope.row.is_interior == 2"
          >{{scope.row.$is_interior}}</el-tag
        >
        <el-tag type="danger" v-if="scope.row.is_interior == 3"
          >{{scope.row.$is_interior}}</el-tag
        >

        <el-tag type="info">标签三</el-tag>
      </template>
      <!-- <template slot-scope="scope" slot="menu">
        <el-button
          v-if="permission.editBtn"
          icon="el-icon-edit"
          :type="scope.type"
          :size="scope.size"
          @click.stop="handleEdit(scope.row, scope.index)"
          >编辑</el-button
        >
        <el-button
          v-if="permission.delBtn"
          icon="el-icon-delete"
          :type="scope.type"
          :size="scope.size"
          @click.stop="handleDel(scope.row, scope.index)"
          >删除</el-button
        >
      </template> -->
    </avue-crud>
  </zc-card>
</template>
页面逻辑 js
<script>
  import { mapGetters } from "vuex";
  import {
    getList,
    update,
    add,
    del,
    updateStatus,
  } from "@/api/admin/{{name}}.js";
  import option from "./{{name}}-options.js";

  export default {
    name: "name",
    data() {
      return {
        permission: {
          addBtn: false,
          editBtn: false,
          delBtn: false,
          excelBtn: false,
        }, //权限
        page: {
          currentPage: 1,
          pageSize: 10,
        },
        form: {},
        params: {},
        loading: false,
        data: [],
        option: {},
      };
    },
    created() {
      const role = this.$defaultRoleStatus;
      this.permission.addBtn = this.zcbtn[this.$options.name + "_add"] || role;
      this.permission.editBtn = this.zcbtn[this.$options.name + "_edit"] || role;
      this.permission.delBtn = this.zcbtn[this.$options.name + "_del"] || role;
      this.permission.excelBtn =
        this.zcbtn[this.$options.name + "_excel"] || role;
      this.option = option(this);
    },
    mounted() {

    },
    computed: {
      ...mapGetters(["zcbtn"]),
    },
    methods: {
      // switch切换 启动禁用
      switchChange(e, id) {
        if (e == 1) {
          updateStatus({ field: "state", value: 1, id }).then((res) => {
            this.$notify({
              title: "成功",
              message: "修改状态成功",
              type: "success",
            });
          });
        }
        if (e == 2) {
          updateStatus({ field: "state", value: 2, id }).then((res) => {
            this.$notify({
              title: "成功",
              message: "修改状态成功",
              type: "success",
            });
          });
        }
      },
      // 上传前
      uploadError(error,column){
        console.error(error)
        console.error(column)
      },
      uploadBefore(file, done, loading) {
      done()
        // 文件处理

        // if (
        //   suffix == "pdf" ||
        //   suffix == "doc" ||
        //   suffix == "docx" ||
        //   suffix == "xlsx"
        // ) {
        //   this.form.info_files_name.push(fileName);
        //   this.form.info_files_suffix.push(suffix);
        //   done();
        //   return;
        // }

        // 什么都不是

        // if (suffix) {
        //   loading();
        //   this.$message.error("请上传正确的格式");
        // }
      },
      // 自定义删除
      handleDel(row, index) {
        this.$refs.crud.rowDel(row, index);
      },
      // 自定义编辑
      handleEdit(row, index) {
        this.$refs.crud.rowEdit(row, index);
      },
      uploadAfter(res, done) {
        done();
      },
      // 获取列表
      getList() {
        this.loading = true;
        const data = Object.assign(
          {
            page: this.page.currentPage,
            limit: this.page.pageSize,
          },
          this.params
        );
        this.data = [];
        return getList(data).then((res) => {
          this.loading = false;
          this.page.total = res.num;
          this.data = res.data;
          return Promise.resolve(true)
        });
      },
      // 新增
      rowSave(row, done, loading) {
        add(row)
          .then(() => {
            this.$message.success("新增成功");
            done();
            this.getList();
          })
          .catch(() => {
            loading();
          });
      },
      // 修改数据
      rowUpdate(row, index, done, loading) {
        update(row)
          .then(() => {
            this.$message.success("修改成功");
            done();
            this.getList();
          })
          .catch(() => {
            loading();
          });
      },
      // 删除
      rowDel(row) {
        this.$confirm("此操作将永久删除, 是否继续?", "提示", {
          confirmButtonText: "确定",
          cancelButtonText: "取消",
          type: "warning",
        })
          .then(() => {
            return del(row.id);
          })
          .then(() => {
            this.$message.success("删除成功");
            this.getList();
          });
      },
      async searchChange(params, done) {
        // console.log(params);
        if (params.add_time && params.add_time.length > 0) {
          params.start_time = params.add_time[0].getTime() / 1000;
          params.end_time = params.add_time[1].getTime() / 1000;
        }
        if (done) done();
        this.params = params;
        this.page.currentPage = 1;
        await this.getList();
        this.$message.success("搜索成功");
      },
      async searchChange2(params, done) {
        console.log(params);
        if (done) done();
        this.params = {};
        this.page.currentPage = 1;
        await this.getList();
        this.$message.success("搜索成功");
      },
      async refreshChange() {
        await this.getList();
        this.$message.success("刷新成功");
      },
    },
  };
</script>
页面样式
.column-img-avatar {
  height: 40px;
  width: 40px;
  border-radius: 50%;
}

.user {
  display: flex;
  align-items: center;
  justify-content: center;
}

.user-msg {
  margin-left: 4px;
  text-align: left;
}

.namex {
  overflow: hidden;
  text-overflow: ellipsis;
  white-space: nowrap;
  width: 110px;
  text-align: left;
}
页面配置详解
import { getToken } from '@/utils/auth'
const defaultSettings = require('../../settings.js')
export default (_self) => {  // _self  页面实例
    return {
        editBtn: true, // 编辑按钮
        delBtn: true, // 删除按钮
        addBtn: true, // 添加按钮
        labelWidth: 140, // 弹窗 labelWidth的宽度
        index: true,  // 是否显示序号
        indexLabel: '序号',
        align: 'center',  // 表格对齐方式
        headerAlign: 'center', // 表头对齐
        border: true,           // 边框
        dialogWidth: '50%',    // 弹窗宽度
        stripe: false,
        size: 'mini',
        excelBtn: true,     // 导出
        selection: true,    // 多选
        searchMenuSpan: 4,
        props: {
            label: 'label',
            value: 'value'
        },
        column: [
           import { getToken } from '@/utils/auth'
const defaultSettings = require('../../settings.js')
export default (_self) => {
    return {
        editBtn: true,
        delBtn: true,
        addBtn: true,
        labelWidth: 140,
        index: true,
        indexLabel: '序号',
        align: 'center',
        headerAlign: 'center',
        border: true,
        dialogWidth: '50%',
        stripe: false,
        size: 'mini',
        // excelBtn: true,
        // selection: true,
        searchMenuSpan: 4,
        props: {
            label: 'label',
            value: 'value'
        },
        column: [
            // 普通字段
            {
                width:80,
                label: "普通字段",
                prop: "pt",
                span: 12,
                rules: [{
                    required: true,
                    message: "请输入",
                    trigger: "blur"
                }]
            },
               // 价格 数量 手机 正则 身份证号
            {
                width:100,
                sortable: true,
                label: "价格",
                prop: "price",
                rules: [{
                        required: true,
                        message: "请输入价格",
                        trigger: "blur"
                    },
                    { pattern: /(^[1-9][0-9]{0,7}$)|(^((0\.0[1-9]$)|(^0\.[1-9]\d?)$)|(^[1-9][0-9]{0,7}\.\d{1,2})$)/, message: '请输入正确的价格', trigger: 'blur' },
                  { pattern: /(^\d{15}$)|(^\d{18}$)|(^\d{17}(\d|X|x)$)/, message: '请输入正确的身份证号码', trigger: 'blur' },
                    { pattern: /^[0-9]\d*$/, message: 'XXX必须是正整数', trigger: 'blur' },
                    { pattern: /^(13[0-9]|14[01456879]|15[0-35-9]|16[2567]|17[0-8]|18[0-9]|19[0-35-9])\d{8}$/, message: '请输入正确的手机', trigger: 'blur' }
                ]
            },
            // 图片上传
            {
                width:100,
                data: {
                    key: getToken()
                },
                tip: '只能上传jpg/png文件,且不超过2m',
                accept: 'image/jpeg,image/png',
                label: '头像',
                prop: 'avatar',
                type: 'upload',
                listType: 'picture-img',
                span: 24,
                propsHttp: {
                    res: 'datas',
                    url:'url'
                },
                action: defaultSettings.uploadImg
            },
            // 图片组
            {
                width:160,
                label: '图片组',
                prop: 'imgs',
                dataType: 'string',
                type: 'upload',
                data: {
                    key: getToken(),
                    file_type: 1,
                },
                span: 24,
                listType: 'picture-card',
                accept: 'image/jpeg,image/png',
                tip: '只能上传jpg/png文件,且不超过2m',
                propsHttp: {
                    res: 'datas',
                     url:'url'
                },
                action: defaultSettings.uploadImg
            },

            {
                 showColumn: false,
                 hide:true,
                width: 120,
                accept: "application/msword,application/vnd.ms-works,application/pdf,application/vnd.openxmlformats-officedocument.spreadsheetml.sheet,application/vnd.openxmlformats-officedocument.wordprocessingml.document",
                label: '附件组',
                prop: 'info_files',
                type: 'upload',
                dataType: 'string',
                loadText: '附件上传中,请稍等',
                span: 24,
                tip: '只能上传pdf/doc/docx/xlsx文件,且不超过10m',
                propsHttp: {
                    res: 'datas',
                     url:'url'
                },
                action: defaultSettings.uploadFile,
            },
            {
                width: 160,
                sortable: true,
                label: "添加时间",
                prop: "add_time",
                row: true,
                span: 12,
                display: false,
                type: 'datetime',
                searchSpan: 12,
                searchRange: true,
                searchSpan: 6,
                search: true,
            },
            // 网络字典  remote远程搜索 multiple多选  typeformate 自定义选框内容 分页长度过多导致弹窗卡顿
            {
                width:100,
                label: "商品名",
                prop: "goods_id",
                type: "select",
                props: {
                    res: "datas.data",
                    label: "WLMC",
                    value: "WLBM",
                },
                // multiple:true,
                // remote: true,
                // typeslot: true,
                // typeformat(item, label, value) {
                //     return `${"编码"}:${item.WLBM}-${item.WLMC}`;
                // },
                span: 12,
                dicUrl: `${
                    defaultSettings.baseUrl
                  }/admin/goods/get_goods_list?key=${getToken()}` +
                    "&api_path=/goods/get_goods_list&WLMC={{key}}&limit=20&page=1",
                rules: [{
                    required: true,
                    message: "请输入商品名",
                    trigger: "blur",
                }, ],
            },
             // 本地字典
            {
                width:80,
                span: 12,
                label: "修改类型",
                prop: "change",
                type: 'select',

                dicData: [{
                        label: '增加',
                        value: 1
                    }, {
                        label: '减少',
                        value: 2
                    },

                ],
                rules: [{
                    required: true,
                    message: '请选择状态',
                    trigger: 'change'
                }],
            },
            {
                width: 80,
                editDisplay: false,
                row: true,
                span: 12,
                label: "是否启用",
                prop: "state",
                search: true,
                searchSpan: 4,
                type: 'select',
                slot: true,
                dicData: [{
                    label: '启用',
                    value: 1
                }, {
                    label: '禁用',
                    value: 2
                }, ],
                rules: [{
                    required: true,
                    message: '请选择状态',
                    trigger: 'change'
                }],
            },
        ],
    }
}
如何跳子页面
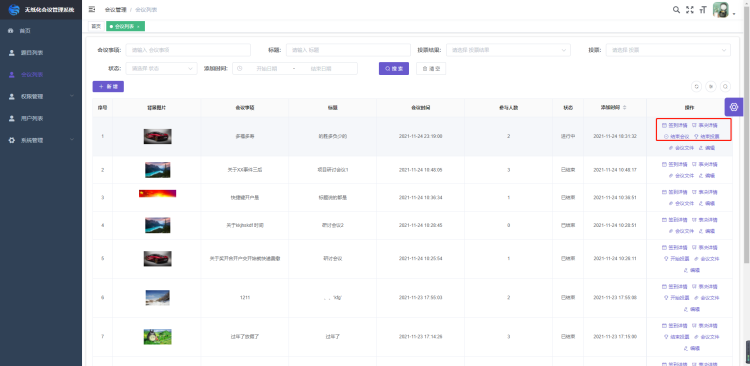
如上图,自定义操作栏表决详情点击后打开了一个新页面,并且这个新页面的 title 和内容都是根据点击的会议而变化的。 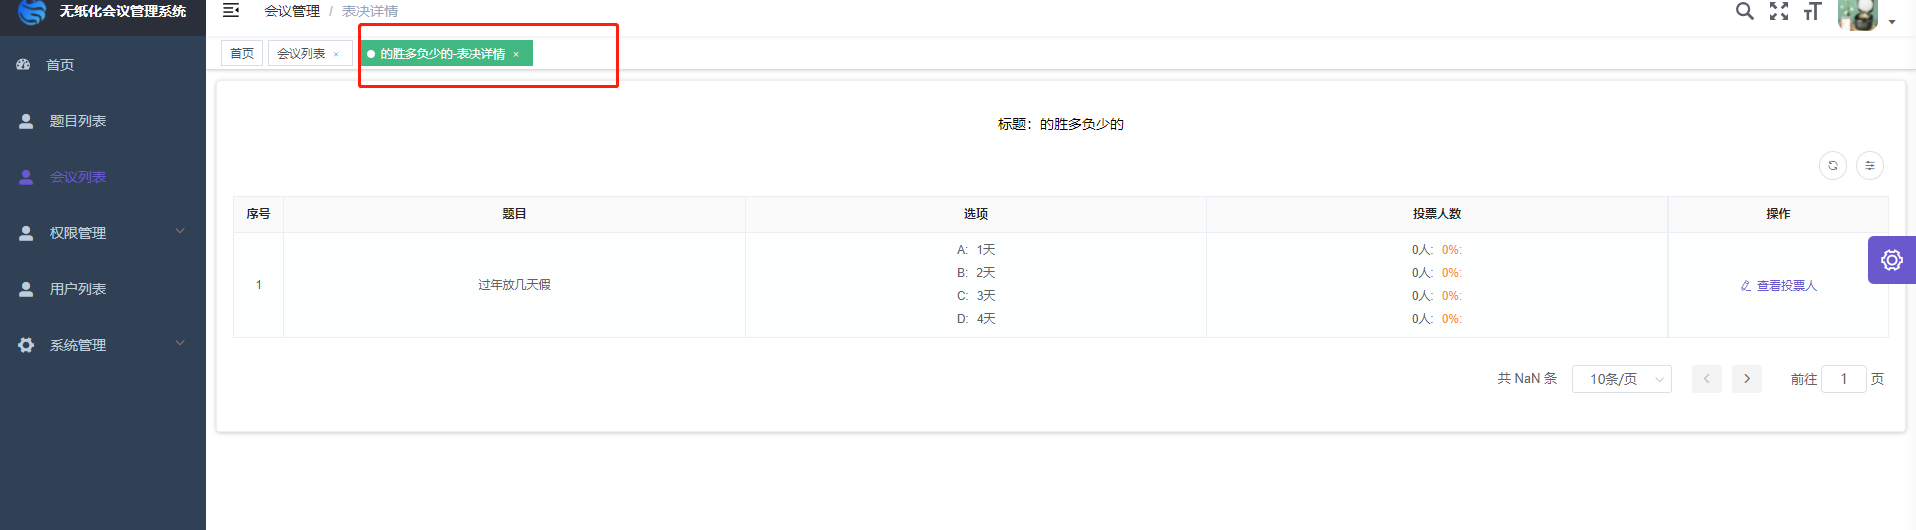 这种情况我们在项目中经常遇到。这里说下操作步骤
- 首先你肯定得有这个页面模块儿,按照上面新增一个页面管理模块先创建这个页面,并将这个页面的 vue,options.js 文件放到跳转主页面同目录下。比如,你是需要在 test 页面模块儿跳转 demo 页面,那么你将 demo 页面建好后放到 test 目录下,同样路由也放入到它的子路由中。如下代码:
 {
  path: '/meeting',
  component: Layout,
  redirect: '/meeting/meeting',
  meta: {
    title: '会议管理',
    icon: 'el-icon-user-solid'
  },
  children: [

    {
      path: 'meeting',
      component: () =>
        import('@/views/meeting/meeting'),
      name: '会议列表',
      meta: { title: '会议列表' }
    },
    {
      path: 'order-meeting_subject_list/:id(\\d+)',//正则id,必须是数字
      component: () =>
          import ('@/views/meeting/meeting_subject_list'),//与会议列表在同一目录
      name: '表决详情',
      meta: { title: '表决详情', icon: 'user', noCache: false, activeMenu: '/meeting/meeting' },
      hidden: true//在侧边菜单不可见
  },
  ]
}
开始跳转,我们来看下meeting.vue中是如何做的 使用 slot="menu"自定义操作栏,这里通过
scope.row可以拿到当前行的数据,并将它通过tosubject()事件传递到逻辑层。<template slot-scope="scope" slot="menu"> <el-button v-if="permission.delBtn" icon="el-icon-delete" :type="scope.type" :size="scope.size" @click.stop="tosubject(scope.row, scope.index)" >表决详情</el-button > </template>
 methods: {
      tosubject(row, index) {//表决详情题目列表
        this.$router.push("/meeting/order-meeting_subject_list/" + row.id);//跳转并加上对应ID
      },
      }
被跳页面
meeting_subject_list.vue中接收参数created() { const meeting_id = this.$route.params && this.$route.params.id;//拿到跳转的id this.meeting_id=meeting_id;//赋值给this,当然你直接赋值肯定是一样 this.tempRoute = Object.assign({}, this.$route); }, methods: { // 获取列表 getList() {//curd自动会调用此方法 this.loading = true; const data = Object.assign( { page: this.page.currentPage, limit: this.page.pageSize, }, this.params ); this.data = []; data.meeting_id=this.meeting_id;//将请求参数加上meeting传过来的meeting_id return getList(data).then((res) => { this.loading = false; this.page.total = res.num; this.setTagsViewTitle(res.meeting.name);//获得了标题后设置标题,这里写到created也可以,主要看需求。 this.meeting=res.meeting; this.data = res.meeting_subject; return Promise.resolve(true) }); }, setTagsViewTitle(id) {//设置标题 const title = "表决详情"; const route = Object.assign({}, this.tempRoute, { title: `${id}-${title}`, }); document.title = `${id}-${title}`;//改变标题 this.$store.dispatch("tagsView/updateVisitedView", route);//不加这句到时候标题点不动 }, }- 测试结果,可能遇到的问题
- 跳转后页面数据没有根据传参筛选,查看你是否在
getList()中对请求参数做了过滤。 - 子路由出现在了侧边栏,查看查看是否在路由中没有隐藏,设置
hidden: true。 - 标题不执行,跳转参数必须是数字,另外检查是否调用了设置标题,它会重新设置路由。
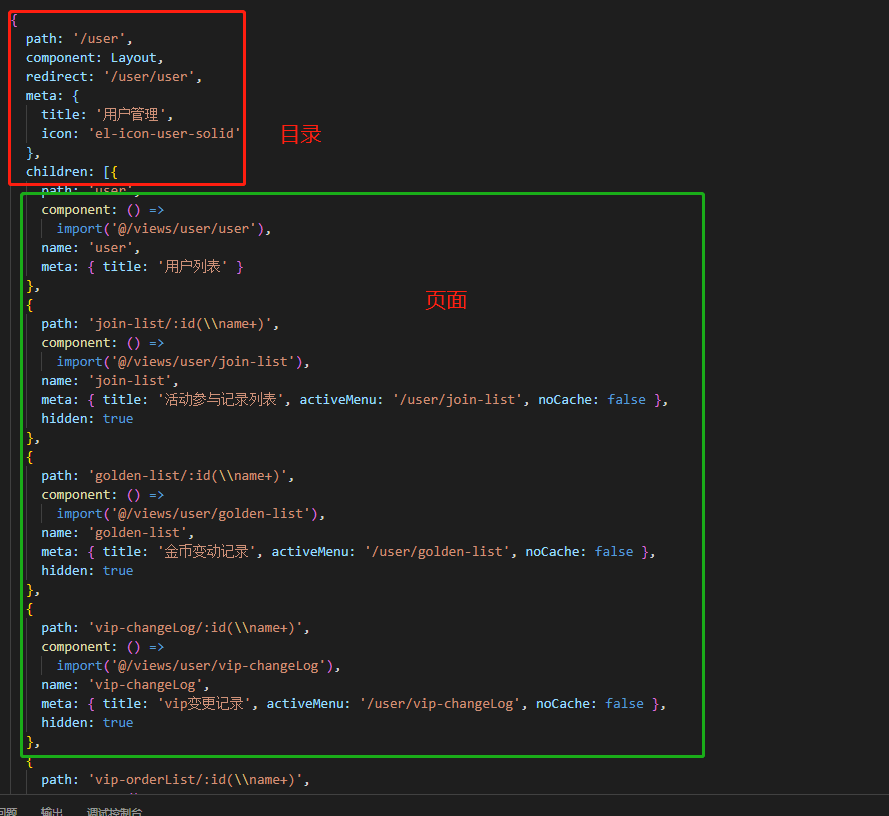
子页面路由传多个参
- 路由
{
path: 'join-list/:id(\\name+)',
path: 'sub-user/:id(\\d+)',
component: () =>
import('@/views/user/sub-user'),
name: 'sub-user',
meta: { title: '下级用户', activeMenu: '/user/sub-user', noCache: false },
hidden: true
},
- 传参
this.$router.push({
path: "/user/sub-user/" + row.id + "?name=" + row.nickname,
});
//上面就是放到事件中执行跳转的,你可以跟多个参数,跟url带参数一样
- 接受参数
created() {
this.$route.query.name
}
复杂表单设计(答题,题目,其他不定项)
如果发现涉及到的表单不好排版,直接用 表单生成器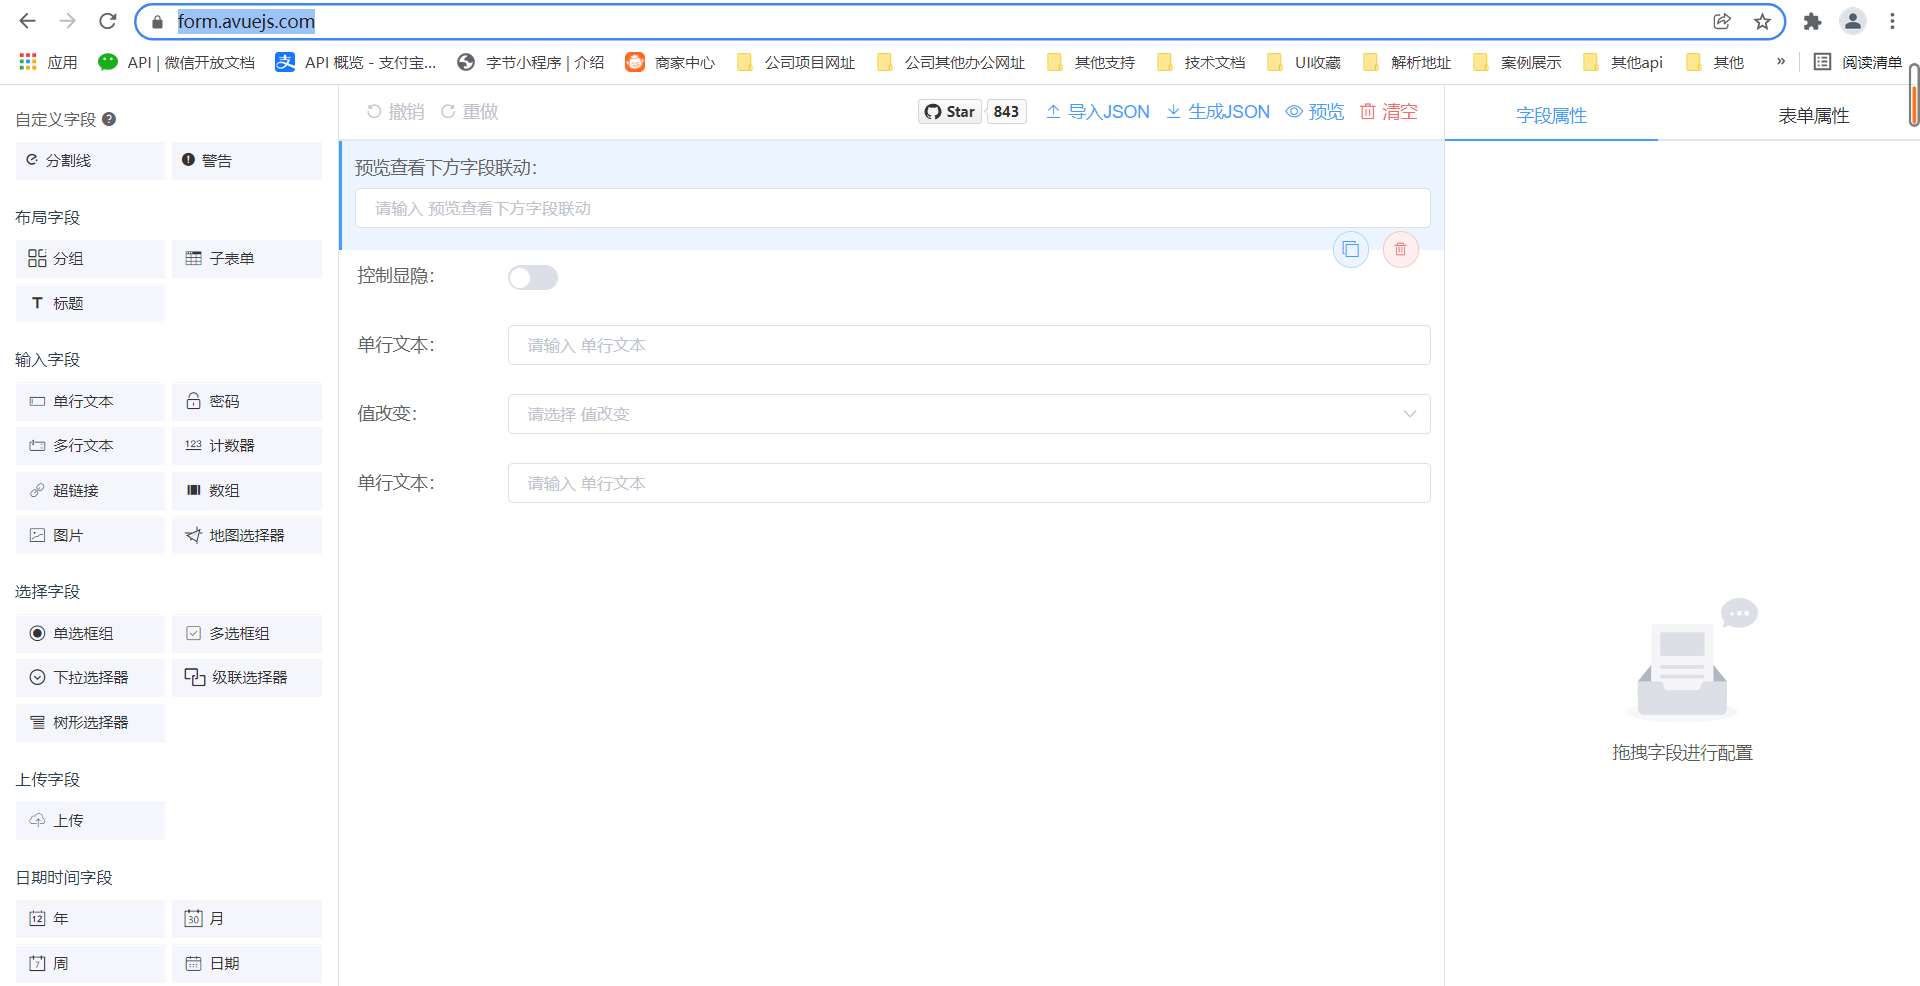
设计完成后点击生成 json 然后去替换掉 options 中的配置项就行了,建议换掉 column 中即可,然后根据实际的 api 去修改配置项 刚开始用的时候注意,凡是涉及到远程数据的,一定是自己设计好样式即可,剩下的自己回来改,不要妄想可以直接配置完
常用表格中一些自定义表单弹框
MessageBox 弹框
this.$confirm("此操作将永久删除, 是否继续?", "提示", {
confirmButtonText: "确定",
cancelButtonText: "取消",
type: "warning",
})
.then(() => {
return del(row.id);
})
.then(() => {
this.$message.success("删除成功");
this.getList();
});
Drawer 抽屉
<template>
<zc-card>
<avue-crud
ref="crud"
:option="option"
:page.sync="page"
:table-loading="loading"
@on-load="getList"
@row-update="rowUpdate"
:upload-delete="uploadDelete"
:upload-after="uploadAfter"
:upload-before="uploadBefore"
:upload-error="uploadError"
@row-save="rowSave"
@row-del="rowDel"
@refresh-change="refreshChange"
@search-reset="searchChange2"
@search-change="searchChange"
v-model="form"
:data="data"
:permission="permission"
>
....
<!-- 这里要注意一定要在<avue-crud>外面 -->
</avue-crud>
<el-dialog
title="会议文件"
:visible.sync="dialogVisible"
width="40%"
:before-close="handleClose"
>
<div class="dialogbox">
<div v-for="file in filelist">
<fileCard :row="file" />
</div>
</div>
</el-dialog>
</zc-card>
</template>
其他(多看下element文档)
里面的组件都可以直接在页面中调用,无需引用
权限管理总分站
上传权限
打开
@src\router\index.js
菜单管理中编辑左侧菜单
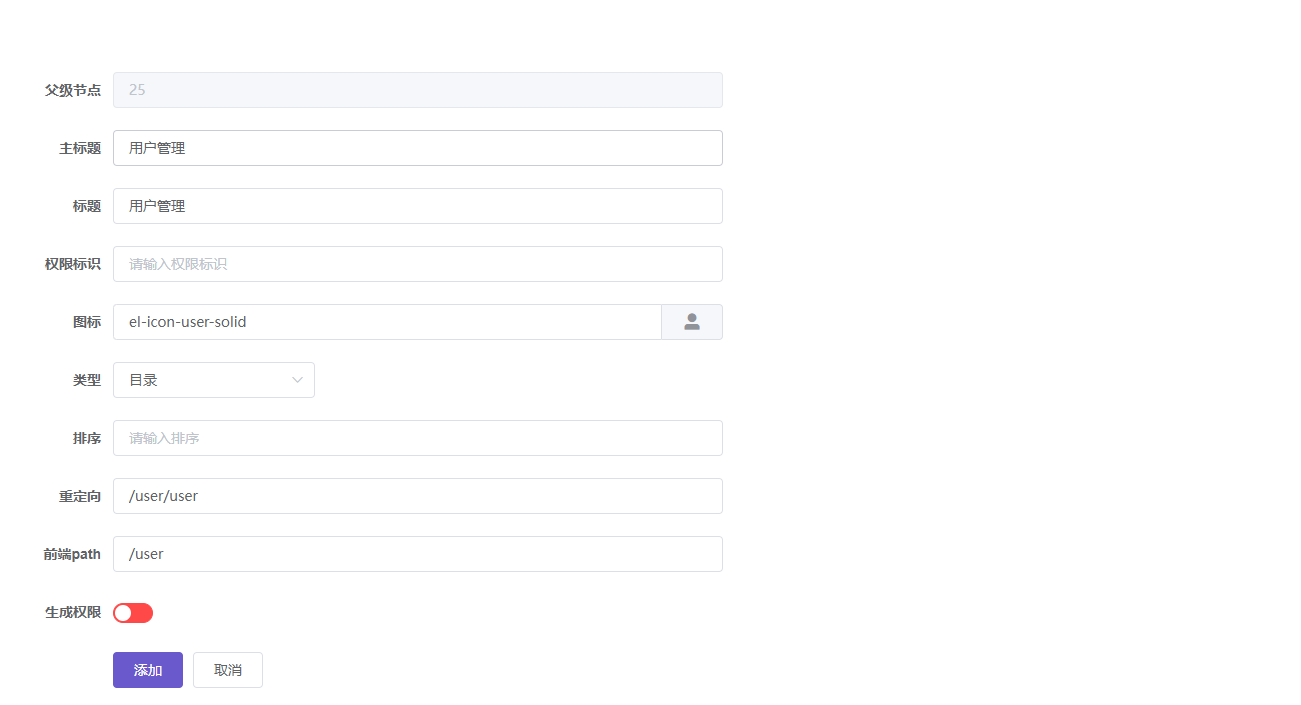
添加一个目录
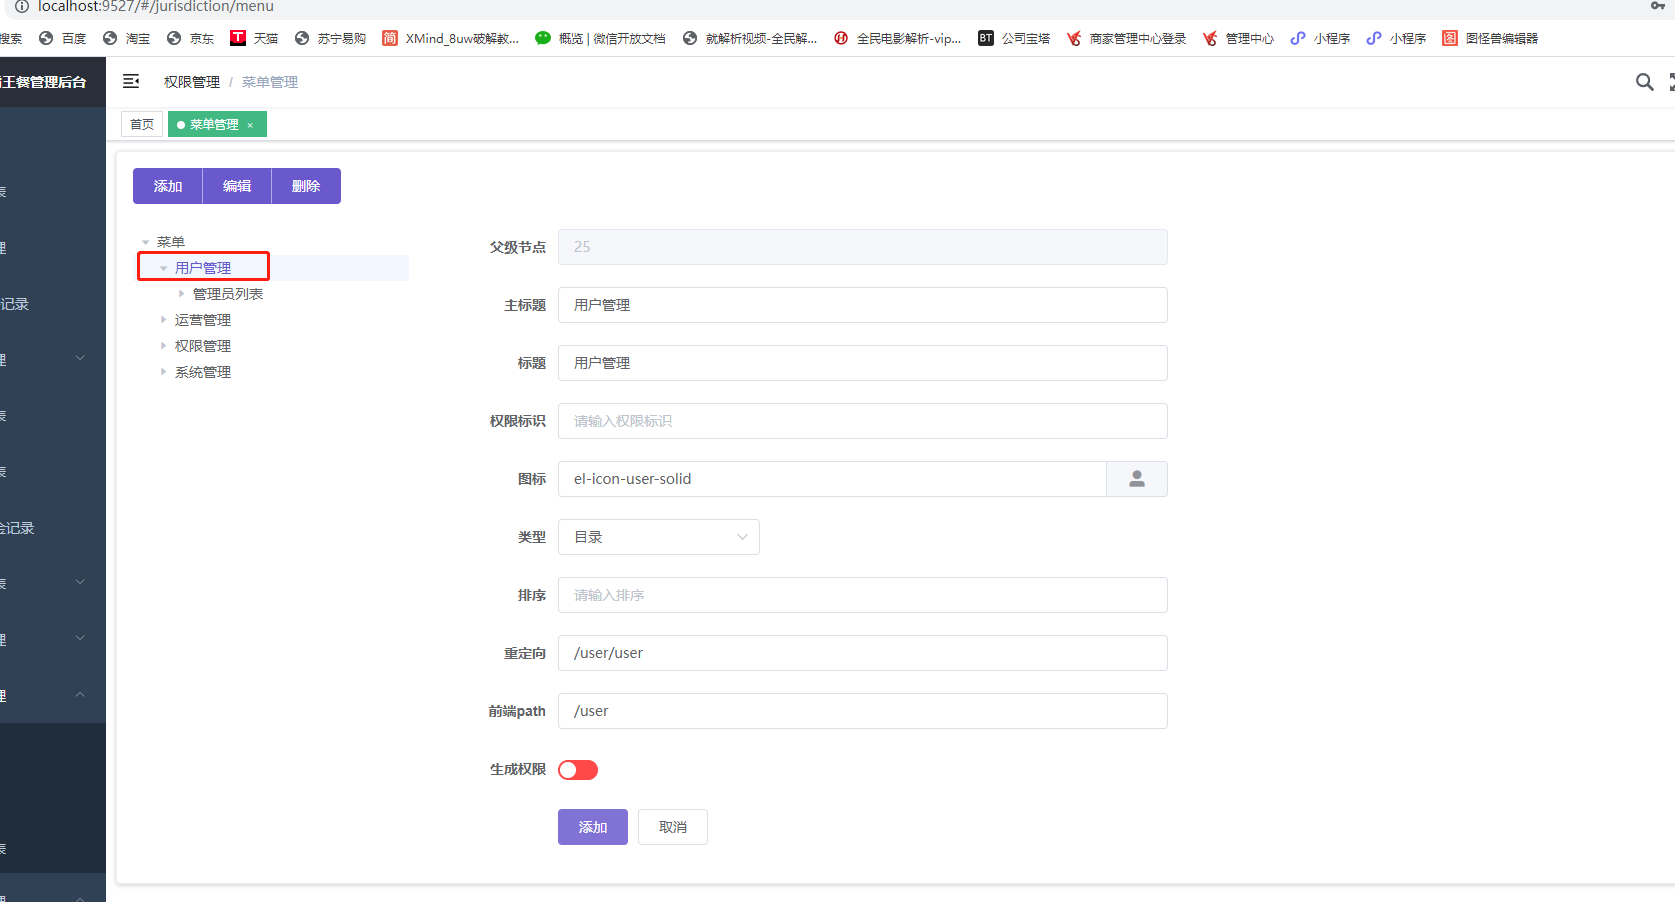
后台默认只处理两级目录菜单,这时候目录则就菜单下的第一级
添加目录下的页面
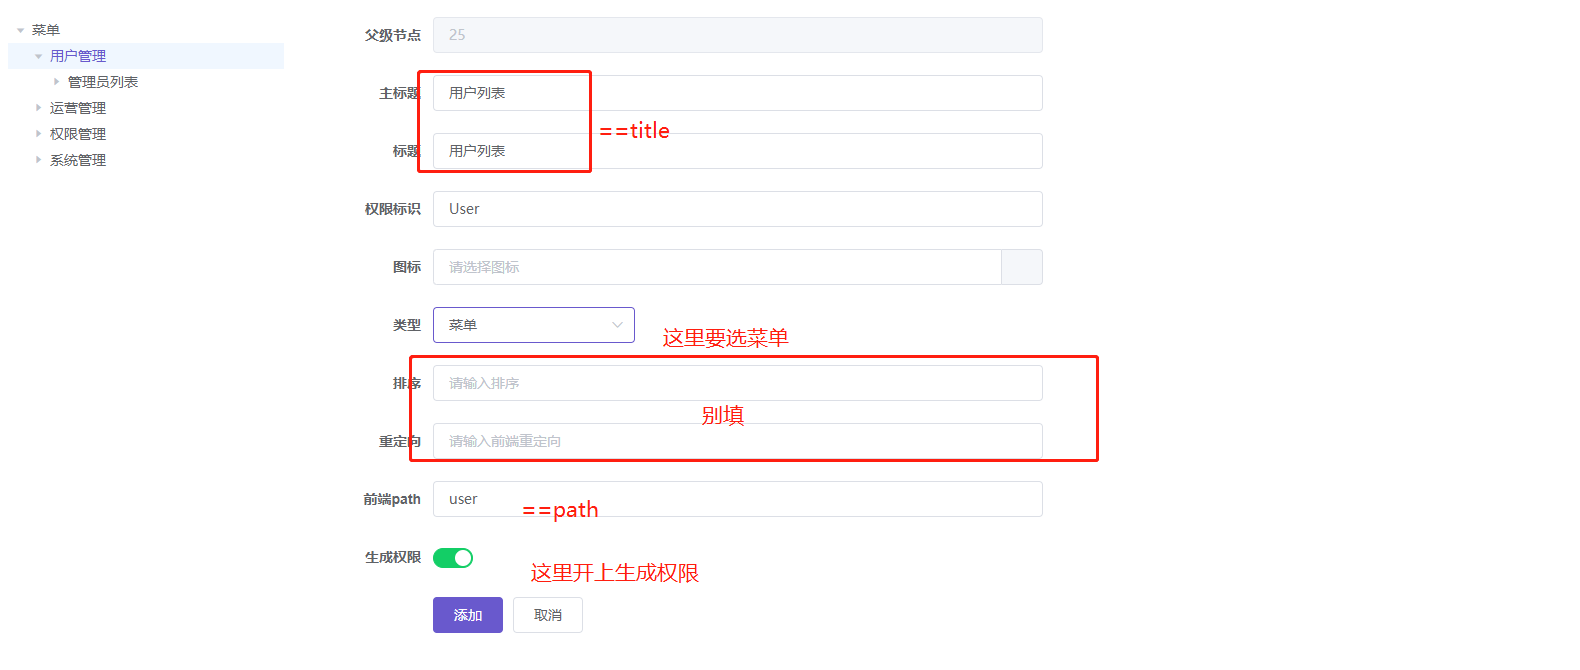 页面添加中的权限标识==页面的 name,path 首次母大写
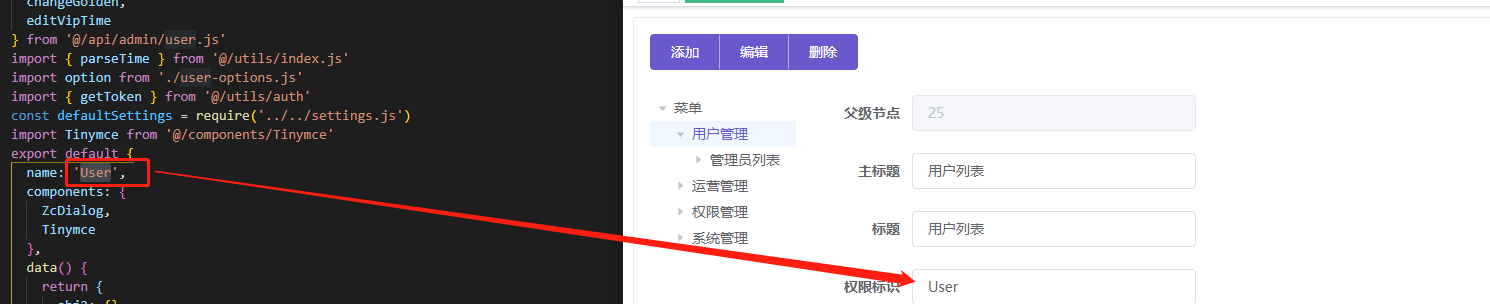
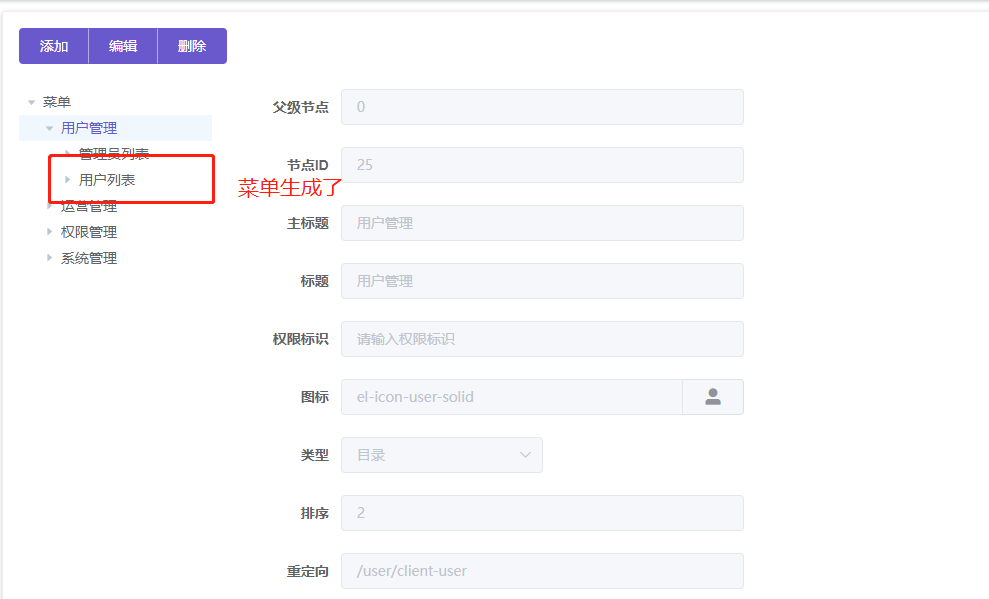
生成菜单
不同角色左侧菜单的管理
角色管理中勾选菜单权限即可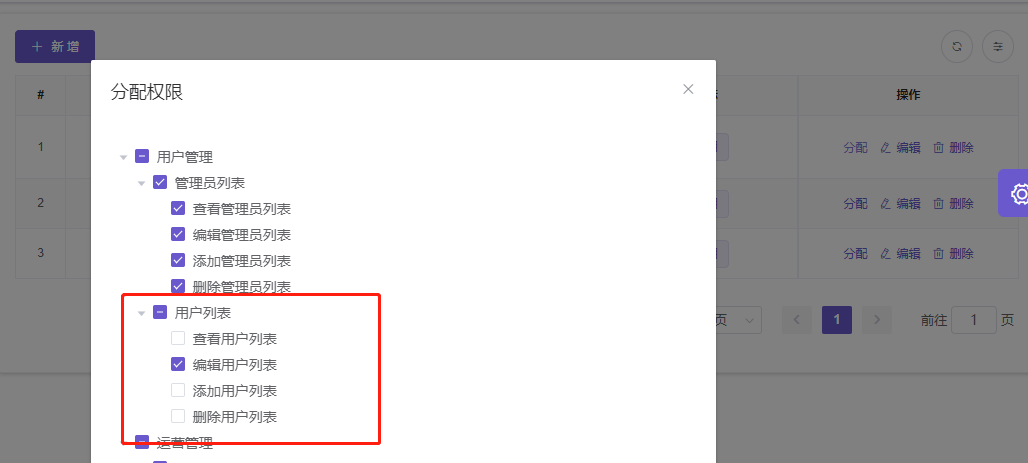
开关默认权限(使用菜单权限值为 false)
@src\settings.js中
const defaultRoleStatus = false; // 默认权限
然后可以运行看结果了
权限管理 FAQ
- 保存后运行没有效果? ctrl+r 刷新一下
- 一不小心角色管理时将权限管理没分,导致现在改不了权限了 _
const defaultRoleStatus = true_ - 页面都没有操作按钮了呢,没有操作权限了 _ 权限标识错误导致按钮权限未生成,重新生成菜单或者手动更改按钮的权限标识 _
- 无论怎么刷新都没有作用 _ 如果你改了全局配置,将默认权限已经关闭,这时候检查一下是不是没有做权限分配 _
按钮权限的管理
我们约定:
| 按钮权限 | 结构前面*加权限标识 |
|---|---|
| 查看 | *_show |
| 编辑 | *_edit |
| 添加 | *_add |
| 删除 | *_del |
添加自定义按钮权限
上面的标识尾巴可以自定义,例如
<template>
<zc-card>
<avue-crud
....
>
....
<el-button v-if="scope.row.vote_state==2&&permission.delBtn" icon="el-icon-trophy" :type="scope.type"
:size="scope.size" @click.stop="setState(scope.row,3)">自定义结束投票</el-button>
</avue-crud>
</zc-card>
</template>
我们看到这里按钮通过一个 v-if 来控制显隐,这里面有个参数 permission 在页面的created()生命周期中进行了定义
...
created() {
// console.log("添加", this.$route.params.id);
this.params.p_id= this.$route.params.id
this.permission.addBtn = this.zcbtn.client_user_add || false;
this.permission.editBtn = this.zcbtn.client_user_edit || false;
this.permission.delBtn = this.zcbtn.client_user_del || false;
this.permission.excelBtn = this.zcbtn.client_user_excel || false;
this.option = option(this);
},
...
所以我们可以改成这样
<zc-card>
<avue-crud
// ....
>
// ....
<el-button v-if="scope.row.vote_state==2&&permission.diyBtn" icon="el-icon-trophy" :type="scope.type"
:size="scope.size" @click.stop="setState(scope.row,3)">自定义结束投票</el-button>
</avue-crud>
</zc-card>
</template>
...
created() {
// console.log("添加", this.$route.params.id);
this.params.p_id= this.$route.params.id
this.permission.addBtn = this.zcbtn.client_user_add || false;
this.permission.editBtn = this.zcbtn.client_user_edit || false;
this.permission.delBtn = this.zcbtn.client_user_del || false;
this.permission.excelBtn = this.zcbtn.client_user_excel || false;
this.permission.diyBtn = this.zcbtn.client_user_diy || false;
this.option = option(this);
},
...
然后我们在页面下添加一个按钮权限即可,参数一致即可实现分配权限了
数据权限区分
我们经常可能会出现不同的用户有不同的数据访问权限,经过前面几步你肯定对权限管理有了一定的了解,接下来我们来看下数据访问的权限,如何根据不同的用户显示不同的数据,比如不同的业务员只能看到自己的订单。
我想我们有必要了解我们的请求数据拦截器与响应数据拦截器
请求数据拦截器与响应数据拦截器
找到我们的
@src\utils\request.js
...
// 请求拦截
service.interceptors.request.use(
config => {
// do something before request is sent
let params = (config.params !== undefined ? config.params : config.data)
// console.log('请求拦截', config)
params['key'] = getToken()
// console.log('请求拦截', params)
params.api_path = config.url
// 重新赋值
if (config.params !== undefined) {
config.params = params
} else {
config.data = params
}
if (store.getters.token) {
// let each request carry token
// ['X-Token'] is a custom headers key
// please modify it according to the actual situation
// config.headers['X-Token'] = getToken()
}
return config
},
error => {
// do something with request error
console.log(error) // for debug
return Promise.reject(error)
}
)
// 响应拦截器
service.interceptors.response.use(
response => {
// console.log('拦截器', response)
const res = response.data
if (res.code !== 200) { // 自定义返回
console.log('致命错误', response)
switch (res.code) {
case 999:
MessageBox.confirm('登录过期,您可以关闭当前页面,或重新登录', '确认注销', {
confirmButtonText: '重新登录',
cancelButtonText: '关闭当前页面',
type: 'warning'
}).then(() => {
store.dispatch('user/resetToken').then(() => {
location.reload()
})
}).catch(() => {
console.log('关闭页面')
closePage()
})
break
case 400:
Message.error(res.datas.error);
break
default:
Message.error('未知错误,请联系超级管理员');
}
return Promise.reject(res)
} else {
return res.datas
}
},
error => {
console.log('致命错误2', error)
if (error && error.response) {
switch (error.response.status) {
case 400:
error.message = '错误请求'
break
case 401:
error.message = '未授权,请重新登录'
break
case 403:
error.message = '拒绝访问'
break
case 404:
error.message = '请求错误,未找到该资源'
break
case 405:
error.message = '请求方法未允许'
break
case 408:
error.message = '请求超时'
break
case 500:
error.message = '服务器端出错'
break
case 501:
error.message = '网络未实现'
break
case 502:
error.message = '网络错误'
break
case 503:
error.message = '服务不可用'
break
case 504:
error.message = '网络超时'
break
case 505:
error.message = 'http版本不支持该请求'
break
default:
error.message = `未知错误${error.response.status}`
}
} else {
error.message = '服务器繁忙,请稍后重试'
}
Message({
message: error.message,
type: 'error',
duration: 5 * 1000
})
return Promise.reject(error)
}
)
通过以上代码我们知道了为什么我们请求中没有带入用户鉴权凭证key,也明白了我们拿到的数据其实做了一遍过滤的.数据权限我们的实现方式无非是在请求时将我们的鉴权参数一并传递过去,后端根据我们的参数返回对应权限的数据,仅此而已。 假设我们的鉴权参数为 test_id,那么我们只需要在这下面加上它
...
params['key'] = getToken()
if(!params[`test_id`]){//这里是为了防止跟搜索冲突
params[`test_id`]=gettestID()//从缓存中取值
}
if(!params[test_id]) 非常重要,一般来说,我们的项目鉴权参数也会在我们的超级管理员中用于搜索,比如分店 id,在超级管理员管理时必然有些筛选分店的操作,所以这里我们用 if 判断是否有值来决定是否带上默认参数。
gettestID() 到底是个啥?在我们的 @src\utils\request.js中有这样一句话 import { getToken } from '@/utils/auth',他其实是一个操作缓存的方法,我们可以进入到 @/utils/auth.js,可以看到如下定义
import Cookies from "js-cookie";
const TokenKey = "Admin-Token";
export function getToken() {
return Cookies.get(TokenKey);
}
export function setToken(token) {
return Cookies.set(TokenKey, token);
}
export function removeToken() {
return Cookies.remove(TokenKey);
}
export function setUserId(userId) {
return Cookies.set("userId", userId);
}
export function getUserId() {
return Cookies.get("userId");
}
export function removeUserId() {
return Cookies.remove("userId");
}
我们约定 *set_ 代表存 _get* 代表取 所以我们在这里直接加入
export function settestID(test_id) {
return Cookies.set("test_id", test_id);
}
export function gettestID() {
return Cookies.get("test_id");
}
注意这里还只是定义了方法,我们还没有存入,那我们在哪里存入呢?一般来说鉴权是根据用户来的,那么我们就从用户登录开始存入这个标识,我们找到登录处理@src\store\modules\user.js
...
// 登录
login({ commit }, userInfo) {
const { username, password } = userInfo
return new Promise((resolve, reject) => {
login({ username: username.trim(), password: password }).then(data => {
// 登录返回的数据
commit('SET_TOKEN', data.key)
commit('SET_USER_ID', data.id)
setToken(data.key)//存入请求凭证
setUserId(data.id)//存入用户id
resolve()
}).catch(error => {
reject(error)
})
})
},
...
好!我们就加在这里吧,请一定要先引入,也就是将import { getToken, setToken, removeToken, getUserId, setUserId, removeUserId } from '@/utils/auth'改为import { getToken, setToken, removeToken, getUserId, setUserId, removeUserId,settestID, } from '@/utils/auth'然后我们在代码中存入值
...
// 登录
login({ commit }, userInfo) {
const { username, password } = userInfo
return new Promise((resolve, reject) => {
login({ username: username.trim(), password: password }).then(data => {
// 登录返回的数据
commit('SET_TOKEN', data.key)
commit('SET_USER_ID', data.id)
setToken(data.key)//存入请求凭证
setUserId(data.id)//存入用户id
settestID(data.test_id)//这里存入test_id
resolve()
}).catch(error => {
reject(error)
})
})
},
...
好!到这里我们实现了数据权限
页面中使用自定义表单<DiyForm>
页面中使用该组件
// ----一定要在avue-crud 外面
</template>
</avue-crud>
<DiyForm
v-if="model_show"
v-model="formData"
:options="formOption"
:show-dialog.sync="model_show"
@submit="changeform"
/>
</DiyForm>
</zc-card>
data 中申明变量
data() {
return {
...
formtype: 1, //表单类型
demand_id: 0, //需求id
formData: {}, //关联的表单存储,
formOption: {}, //表单配置
model_show: false, //组件显示
};
},
事件中赋值表单配置,详见配置表
//签约
ondemand_signing(row) {
this.formtype = 4;//多个配置表单用type区分,只有一个可以不用
this.demand_id = row.id;
this.formData = {};
this.formOption = {//赋值配置
emptyBtn: false,
submitBtn: false,
title: "签约",
column: [
{
type: "date",
format: "yyyy-MM-dd",
valueFormat: "timestamp",
label: "签约时间",
span: 24,
display: true,
prop: "signing_day",
},
{
type: "number",
label: "签约金额",
span: 24,
display: true,
prop: "signing_price",
},
],
};
let coshow = setTimeout(() => {//延时配置表单
this.model_show = true;
clearTimeout(coshow);
}, 200);
},
//转出需求
ondemand_transfer(row) {
this.formtype = 3;//多个配置表单用type区分,只有一个可以不用
this.demand_id = row.id;
this.formData = {
turn_admin_id: row.admin_info.id,
};
this.formOption = {//赋值配置
emptyBtn: false,
submitBtn: false,
title: "转给同事",
column: [
{
type: "select",
label: "商务",
span: 24,
display: true,
prop: "turn_admin_id",
dicUrl: `${
defaultSettings.baseApi
}/ywgl_admin/all_list?key=${getToken()}&type=1`,
props: {
label: "realname",
value: "id",
res: "datas.data",
},
rules: [
{
required: true,
message: "请选择商务",
},
],
},
],
};
console.log(this.formOption);
let coshow = setTimeout(() => {//延时配置表单
this.model_show = true;
clearTimeout(coshow);
}, 200);
},
表单确定提交事件
changeform(value, downe) {
value.demand_id = this.demand_id;
switch (this.formtype) {//根据不同的表单请求不同的接口
case 1: //跟进
value.make_time = value.make_time / 1000;
demand_up(value).then((res) => {
this.getList();
downe();
});
break;
case 2: //跟进
up_programme(value).then((res) => {
this.getList();
downe();
});
break;
case 3: //转出
demand_transfer(value).then((res) => {
this.getList();
downe();
});
break;
case 4: //签约
value.signing_day = value.signing_day / 1000;
demand_signing(value).then((res) => {
this.getList();
downe();
});
break;
case 5: //舍弃
demand_abandon(value).then((res) => {
this.getList();
downe();
});
break;
}
},
formOption配置表
| 参数 | 类型 | 含义 | 默认值 |
|---|---|---|---|
| emptyBtn | Boolean | 是否需要清空按钮 | true |
| submitBtn | Boolean | 是否显示表单中的提交按钮,因为外面已经显示,所以这里也是不要 | 默认值 |
| cancelText | String | 取消弹窗文字 | - |
| submitText | String | 提交表单按钮的文字 | - |
| title | String | 表单的标题 | - |
| width | String | Dialog 的宽度 | 50% |
搜索导出
在avue-crud中配置:search.sync="search"可以获得搜索条件 详见搜索自定义
时间格式处理
使用format指定输入框的格式;使用valueFormat指定绑定值的格式。详见日期格式化
<avue-form v-model="form" :option="option"></avue-form>
<script>
export default {
data() {
return {
form:{
"datetime": "2021-08-02 12:00:00"
},
option:{
column: [{
label: "日期",
prop: "datetime",
type: "datetime",
format:'yyyy年MM月dd日 HH时mm分ss秒',
valueFormat:'yyyy-MM-dd HH:mm:ss'
}, {
label: "时间戳",
prop: "datetime",
type: "datetime",
format: "yyyy-MM-dd hh:mm:ss",
valueFormat: "timestamp",
}]
},
};
}
}
</script>
子表单的事件
子表单中我们经常会有输入框,选项等表单,他们都有事件,事件中avue文档介绍的很笼统,我们将事件这块儿单独列出来给小白们讲一下
//下面是一个子表单中根据填写的值改变另外一个子表单的内容的范例
{
type: "dynamic",
label: "功能",
span: 24,
row: true,
display: true,
children: {
align: "center",
headerAlign: "center",
index: false,
addBtn: true,
delBtn: true,
column: [
{
type: "input",
label: "功能",
span: 24,
display: true,
prop: "name",
},
{
type: "input",
label: "工时",
span: 24,
type: "number",
display: true,
change: ({ column, index, row, value }) => {
if(!row.price){
row.price = value * this.unit_price;
}
},
prop: "day",
},
{
type: "input",
label: "价格",
type: "number",
span: 24,
display: true,
prop: "price",
},
{
type: "textarea",
label: "功能内容",
span: 24,
display: true,
prop: "content",
},
],
},
prop: "info",
},
图片上传
// 图片上传
{
width:100,
data: {
key: getToken()
},
tip: '只能上传jpg/png文件,且不超过2m',
accept: 'image/jpeg,image/png',
label: '头像',
prop: 'avatar',
type: 'upload',
listType: 'picture-img',
span: 24,
propsHttp: {
res: 'datas',
url:'url'
},
action: defaultSettings.uploadImg
},
图片上传后提示请登录
data: {
key: getToken()
},
// 结构中没有这个data参数,或者没有key
上传文件带参数
data: {
key: getToken(),
data:'我能带任何参数,并且你可以在上传成功后拿到'
},
// 结构中没有这个data参数,或者没有key
上传后图片不显示
propsHttp: {
res: 'datas',
url:'url'//这里不配置可能不显示图,当然你看下返回,这个url参数有没有域名
},
// 结构中没有这个data参数,或者没有key
子路在面板标签中无法选中
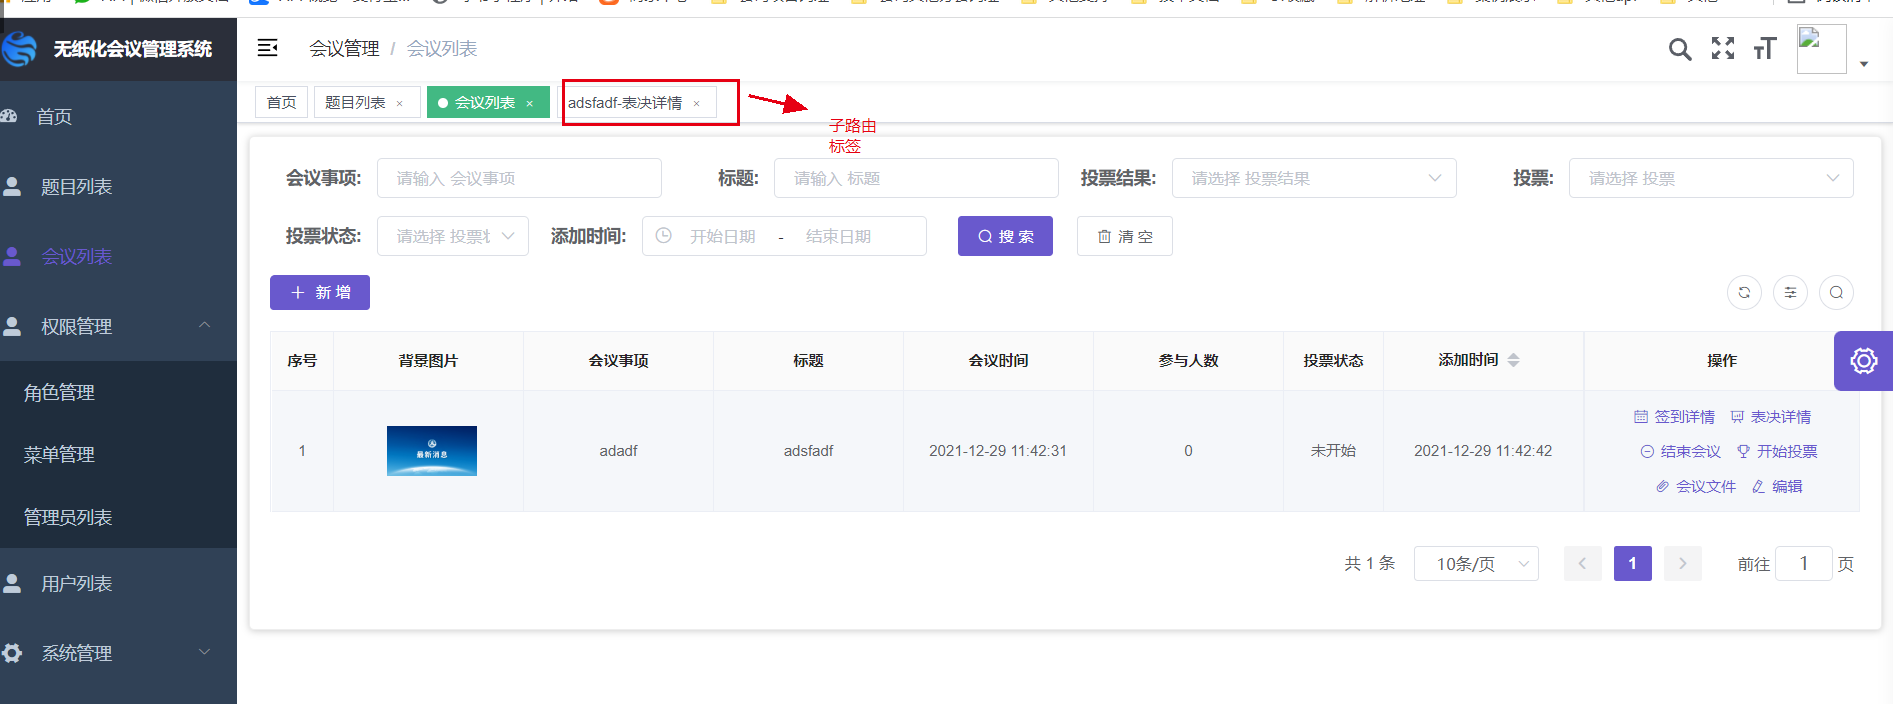 加入
加入this.$store.dispatch("tagsView/updateVisitedView", route);
created() {
   const meeting_id = this.$route.params && this.$route.params.id;//拿到跳转的id
   this.meeting_id=meeting_id;//赋值给this,当然你直接赋值肯定是一样
   this.tempRoute = Object.assign({}, this.$route);

   },
methods: {
   // 获取列表
    getList() {//curd自动会调用此方法
     this.loading = true;
     const data = Object.assign(
       {
         page: this.page.currentPage,
         limit: this.page.pageSize,
       },
       this.params
     );
     this.data = [];
     data.meeting_id=this.meeting_id;//将请求参数加上meeting传过来的meeting_id
     return getList(data).then((res) => {
       this.loading = false;
       this.page.total = res.num;
       this.setTagsViewTitle(res.meeting.name);//获得了标题后设置标题,这里写到created也可以,主要看需求。
       this.meeting=res.meeting;
       this.data = res.meeting_subject;
       return Promise.resolve(true)
     });
   },
   setTagsViewTitle(id) {//设置标题
   const title = "表决详情";
   const route = Object.assign({}, this.tempRoute, {
     title: `${id}-${title}`,
   });
   document.title = `${id}-${title}`;//改变标题
   this.$store.dispatch("tagsView/updateVisitedView", route);//不加这句到时候标题点不动
 },


 }